Description
I. Introduction
SCG-W3000 is an imaging device that utilizes chemiluminescence technology and is equipped with a high-sensitivity cooled camera with 9 million pixels. It enables fast, accurate, and high-throughput detection and imaging of samples, and is widely used in fields such as life sciences, medicine, and environmental protection.
II. Features
Real-time Imaging: Present the changes in sample signals during the exposure process in real-time, capturing every detail of the shot. Overexposed areas will be indicated for samples that are overexposed.
Time Imaging: After the exposure is completed, every frame image within the exposure time can be generated. Through precise retrospective adjustments, users can select any frame image within that exposure time as the final output.
Time Accumulation: For samples with insufficient exposure, users can choose to continue the exposure after the exposure ends, allowing the sample to obtain additional exposure effects based on the exposure time already accumulated.
Automatic Exposure: Intelligent exposure technology can quickly determine the optimal exposure time. With the functions of time imaging and time accumulation, users can obtain the best image results with just one operation.
III. Technical Specifications and Precautions
| Product Name | Chemiluminescence Imaging System | |
| Cat. No. | SCG-W3000 | |
| Dimensions | 400mm×371mm×700mm | |
| Camera | Pixel Resolution | 9 million pixels |
| Resolution | 3000×3000 | |
| Pixel Size | 3.76μm×3.76μm | |
| Target Size | 1 “(11.28mm×11.28mm) | |
| Full Well Capacity | 16.5ke-(HCG),50.5ke-(LCG) | |
| Sensitivity | 877mv@1/30s | |
| Readout Noise | 1.24e-(HCG), 3.22e-(LCG) | |
| Dark Current | 0.0003e-/s/pixel@-15℃ | |
| Signal-to-Noise Ratio | 42.2dB(HCG), 47dB(LCG) | |
| Exposure Time | 0.1ms~1h | |
| Binning Mode | 1×1, 2×2, 3×3 | |
| Grayscale | 16-bit (65536 levels) | |
| Cooling | Relative to Ambient Temperature-40℃ | |
| Camera Type | Black and White Camera | |
| Lens | Aperture | F0.95-F16 |
| Focal Length | 17mm | |
| Type | Fixed Focus Lens | |
| Light Source | Bright Field Light Source | Downward-facing LED white light source, symmetrically distributed on both sides |
| Dark Box | Light Isolation | Fully light-sealed, isolates environmental light. |
| Door Control | Door control sensor can control the on/off of the bright field light source. | |
| Field of View | Effective field of view is 136mm*136mm (expandable to 200mm×200mm if needed). | |
| Software Functions | Software Functions | Real-time Imaging: Real-time presentation of changes in sample signals during exposure process, capturing every detail of the capture. |
| Overexposed areas can be displayed. | After exposure, each frame image within the exposure time can be generated. Users can select any frame image for the final output by precise retrospective adjustment. | |
| Time Imaging | For samples with insufficient exposure, users can choose to continue exposure after the exposure ends, allowing the sample to gain additional exposure effect based on the already exposed time. | |
| Auto Exposure | Intelligent exposure technology quickly determines the optimal exposure time. With time imaging and time accumulation functions, users can obtain the best image result with just one operation. | |
| Industrial Computer | 10.4 inches, 1024×768, Windows operating system | |
| External Interfaces | 2 USB 3.0 ports | |
| Operating Voltage | 100V-240V | |
| Product Power | 100W | |
| Product Net Weight | 25Kg | |
Notes:
1. It is prohibited to touch or scratch the internal lenses of the dark box with hands or sharp objects.
2. After placing the experimental samples, make sure to close the instrument’s flip door to prevent external light from entering the dark box and affecting the experimental results.
3. During imaging experiments, shaking the experimental table or instrument is prohibited to avoid impacting the image quality.
4. Pay attention to electrical safety. Pulling or moving the power cord during the experiment is prohibited.
5. After the experiment is completed, clean the samples and any residues inside the dark box thoroughly.
IV. Functional Description
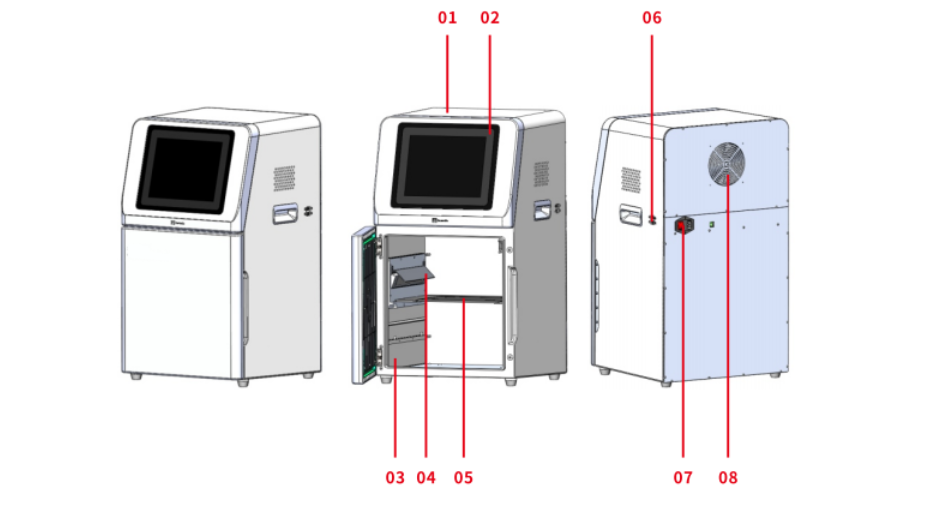
① Internal camera lens assembly, which is the core component of the imaging system.
② 10.4-inch industrial computer with user software operating interface.
③ High-quality light-shielded imaging dark box.
④ Sample tray, removable, used for placing samples to be photographed.
⑤ LED white light source for illumination.
⑥ Power socket and switch.
⑦ Cooling device.
⑧ External USB 3.0 interface.
V. Operating Procedures
1. Power On
Plug in the power cord and turn on the power switch at the back of the instrument. The industrial computer will start up.
2. Sample Loading
Open the instrument door, take out the sample tray, place the prepared text sample on the tray, and then place the tray flat in the groove inside the instrument dark box. Close the instrument door.
3. Launching the Chemiluminescence Imaging Software
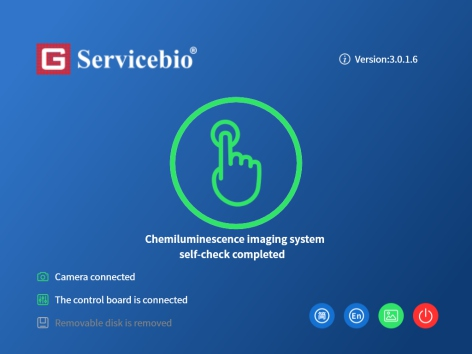
After the industrial computer starts up, the chemiluminescence application software will be automatically loaded. Once the software is successfully launched, it will navigate to the main page.
The top-left section displays the company logo.
The bottom-left section is the status bar, showing the current camera and control board connection status, as well as detection of the inserted removable disk.
The top-right section displays the software version number.
The bottom-right section includes buttons for switching between simplified/traditional Chinese, switching to English, exporting the page, and closing the program.
Clicking on the central icon will enter the preview and capture page.
4. Software Self-Check
If the software starts abnormally, or if the camera or control board is not connected, the text in the software system will turn gray, and the central icon will also become gray. The self-check completion prompt will turn red, and it will not be possible to click into the preview and exposure page. At this time, you need to check whether the camera and PCB board drivers are correctly installed.

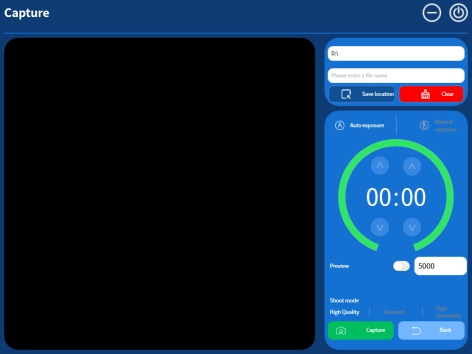
5. Preview and Capture Pages
In the preview page, you need to enter the location where the experimental results will be stored. The file name is an optional input to facilitate file searching for the user.
The user can choose between manual exposure and automatic exposure as the current experimental mode. For manual exposure, the user needs to input the exposure time for the exposure. For automatic exposure, the algorithm calculates the optimal exposure time.
On the right side of the preview page, there is a time input field in microseconds (us), which represents the exposure time for the bright field image. Clicking the preview switch will start the preview, and the preview time can be adjusted as needed.
Shooting mode: High quality, standard, high sensitivity. You can choose a mode to shoot according to your needs, the high-quality mode takes the best image quality, the standard mode takes into account the image quality and shooting time, and the high-sensitive mode takes the shortest shooting time.
Clicking the capture button will initiate the capture and exposure process, while clicking the back button will return to the main page.
Preview and Capture Pages
6. Capturing Process
(1) Select automatic exposure and set preview time.
Automatic exposure: Intelligent exposure technology can quickly determine the optimal exposure time.
(2) Real-time imaging.
Click the capture button to start the exposure. The left side displays the stripe, while the right side shows the countdown of the exposure time. As the countdown progresses, the stripe on the left side will show real-time imaging.
Real-time imaging: Real-time display of changes in sample signal during the exposure process, enabling users to grasp every detail of the capture process. This breakthrough function not only improves capture efficiency but also greatly enhances user interaction experience.
During the real-time imaging process, any overexposed areas in the stripe will be displayed in red. If the stripe is judged to meet requirements, the user can click the stop button in the lower right corner to end the exposure early.
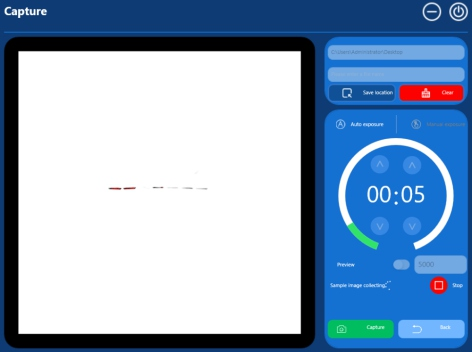
Real-time imaging
(3) Temporal imaging, temporal accumulation.
After the exposure is completed, it automatically enters the results page where adjustments can be made to the captured results.
Time imaging:Through precise retrospective adjustments, users can select any frame within the exposure time as the final output result.
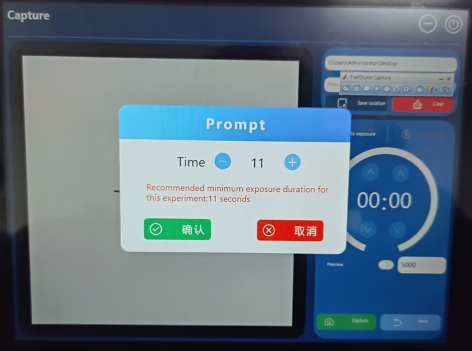
Time accumulation:Even after the exposure is completed, users can choose to continue exposure to obtain additional exposure effects based on the already exposed time. When clicking on “continue exposure,” the user will be prompted with the minimum exposure time. The set time needs to be greater than this minimum time. If the set time is shorter than this minimum time, the actual exposure time will be the suggested minimum exposure time.
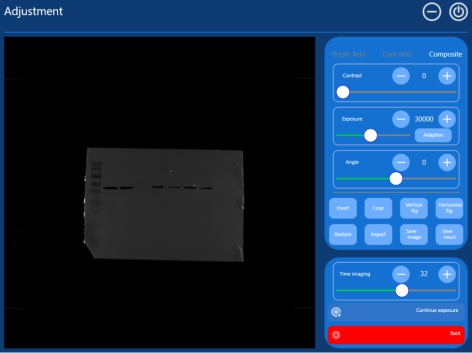
Figure 4.5 Temporal imaging
Temporal accumulation
(4) Image adjustments, result saving. After obtaining satisfactory images through automatic exposure, continued exposure, and temporal imaging, adjustments can be made to the bright field image, dark field image, and composite image on the results page.
① Contrast:Adjust the brightness and darkness of the bright field image.
② Exposure:Adjust the lightness and darkness of the dark field image. Clicking on “auto-adapt” can recommend the most suitable value.
③ Rotation: Rotate the image.
④ Invert:Apply an inverted color effect to the image, turning black into white and white into black.
⑤ Crop: Clicking on crop will generate a region on the image. This region can be resized, and after selecting the appropriate size, clicking on crop again will crop out the desired area.
⑥ Vertical flip:Flips the image vertically.
⑦ Horizontal flip:Flips the image horizontally.
⑧ Restore:Restores the image to its original state.
⑨ Import: Select the file automatically saved by the program to import it into the program for further operations.
⑩ Image saving: Save the image and also save the bright field image, dark field image, and composite image.
⑪ Result saving: Save the adjusted image as an encrypted file.
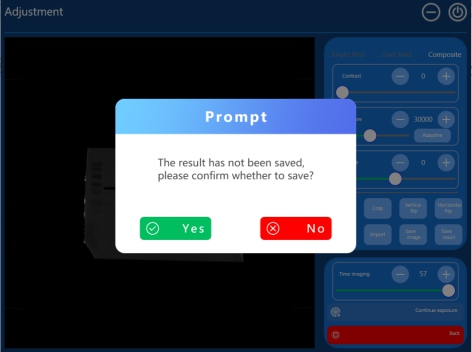
If any adjustments are made to the image on the results page
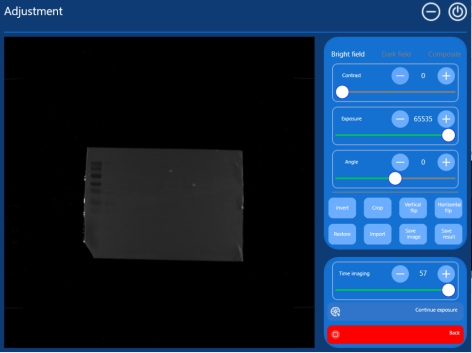
Bright field image
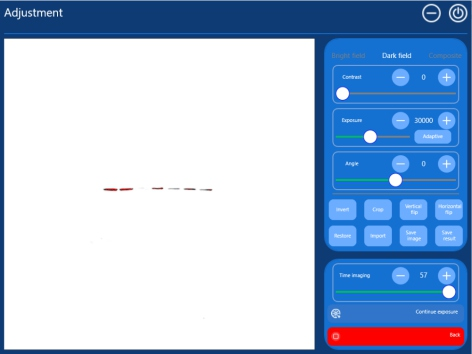
Dark field image
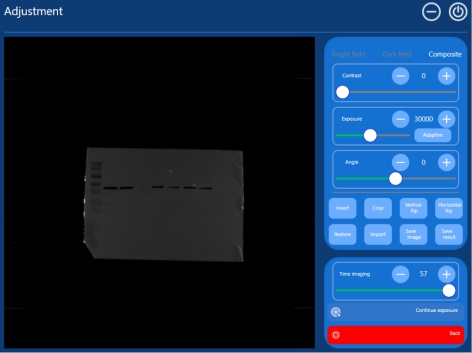
Composite Image
Result saving
7. Export Page
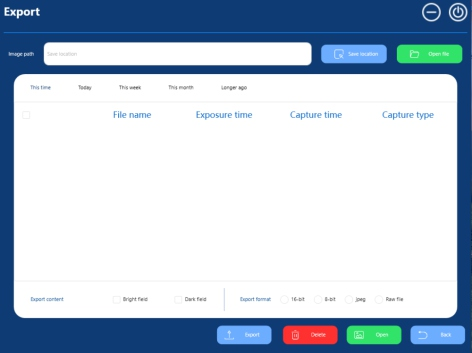
Export page
① Storage location: Select the location of the image files automatically saved by the system, and the contents of the files will be displayed in a list format in the system.
② Open file: Open the selected directory.
③ Export: Select the export content and format to export the images.
④ Delete: Select the image file to be deleted, and it will be deleted.
⑤ Open: Select the corresponding file in the list to open and jump to the result page. You can operate on the image on the result page, or double-click the corresponding file to open it.
⑥ Return: Click “Return” to return to the main page.