Western blotting is a cornerstone technique in molecular biology, used to detect and analyze proteins in a complex sample. Traditionally, chemiluminescent detection methods were widely used for visualizing proteins. However, fluorescent staining has gained considerable popularity in recent years due to its numerous advantages, including improved sensitivity, multiplexing capabilities, and quantitative accuracy. If you’re looking to optimize your Western blot analysis, fluorescent staining is a great option. In this blog, we’ll explore how you can enhance your Western blot using fluorescent staining, providing practical tips for better visualization and analysis.
Why Choose Fluorescent Staining for Western Blots?
Fluorescent staining offers several distinct advantages over traditional chemiluminescent methods:
- Higher Sensitivity: Fluorescent detection typically provides a much higher signal-to-noise ratio, allowing you to detect low-abundance proteins with ease.
- Multiplexing: You can use multiple fluorescently labeled antibodies that emit light at different wavelengths, allowing you to detect and compare multiple proteins in a single blot.
- Quantitative Accuracy: Fluorescence is less subject to variability and background interference, leading to more reliable and reproducible quantification.
- Longer Detection Window: Unlike chemiluminescence, which fades over time, fluorescence offers a more stable and longer detection period, giving you more flexibility in your imaging process.
Now, let’s dive into the best practices for using fluorescent staining in Western blotting.
1. Selecting the Right Fluorescent Dye
Choosing the right fluorescent dye is essential to optimize your Western blot. When selecting a fluorescent label, consider the following factors:
- Spectral Properties: Choose fluorophores that emit light in distinct wavelengths, especially if you are multiplexing. For example, Alexa Fluor 488, 647, or 750 are commonly used dyes that emit in different spectra.
- Compatibility with Antibodies: Ensure that the dye you choose is compatible with your primary antibody. Many commercial antibodies are already conjugated to specific fluorophores, making your job easier.
- Photostability: Some fluorophores are more photostable than others, meaning they resist fading when exposed to light over time. Select photostable dyes for more accurate quantification.
2. Optimizing Your Antibody Concentrations
To get the best results with fluorescent Western blotting, antibody concentration is crucial. Too much antibody can result in high background noise, while too little may lead to weak signals. Here are some tips:
- Primary Antibody: Follow the manufacturer’s recommended concentration guidelines. If necessary, optimize by testing a range of dilutions to find the best signal-to-noise ratio.
- Secondary Antibody: Fluorescent secondary antibodies are typically used to amplify the signal. A common mistake is using too high a concentration of the secondary antibody. A 1:10,000 to 1:50,000 dilution is usually optimal for most applications. Again, titrate to find the best dilution.
3. Reducing Background Signal
Fluorescent staining can sometimes result in unwanted background fluorescence, which can obscure your target protein bands. To reduce background:
- Blocking: Use a high-quality blocking solution (e.g., 5% non-fat dry milk or BSA) to prevent nonspecific binding of antibodies to the membrane. Cepham BLOTTO Blocking buffer is an excellent choice https://www.cephamls.com/blotto-blocking-buffer-5-milk-protein/.
- Wash Thoroughly: After incubating with both primary and secondary antibodies, perform multiple washes with PBS or TBS containing Tween-20 (0.1%) to remove unbound antibodies.
Cepham Life Sciences offers both PBS (Phosphate Buffered Saline) https://www.cephamls.com/pbs-phosphate-buffered-saline-1x/ and TBS (Tris-Buffered Saline), https://www.cephamls.com/tbs-10x-tris-buffered-saline-100mm-tris-hcl-1-5m-nacl-ph-7-5/ which are excellent for washing steps during Western blotting to minimize background and ensure optimal signal detection:
4. Choosing the Right Membrane
The type of membrane you use can also influence your fluorescent Western blot results. PVDF (Polyvinylidene fluoride) membranes generally offer better sensitivity for fluorescent detection than nitrocellulose membranes, which may quench fluorescence. Cepham Life Sciences provides both PVDF membranes https://www.cephamls.com/pvdf-membrane-precut/ and nitrocellulose membranes https://www.cephamls.com/nitrocellulose-membrane-precut/ for Western blotting.
- Ensure Proper Transfer: To avoid background fluorescence from inefficient transfer, ensure that the proteins are transferred evenly across the membrane. Using a semi-dry or wet transfer system, depending on your needs, can improve the consistency of your transfer.
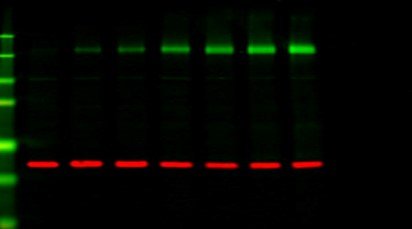
5. Multiplexing: Visualizing Multiple Proteins
One of the greatest advantages of fluorescent Western blotting is the ability to detect multiple proteins simultaneously using different fluorophores. This technique allows you to:
- Compare Proteins in a Single Experiment: Multiplexing helps compare the expression of multiple proteins in the same sample, reducing the need for repeat experiments.
- Normalized Protein Expression: You can probe for housekeeping proteins in parallel to normalize the expression of your target proteins, enhancing the robustness of your data.
6. To multiplex effectively:
- Choose fluorophores with minimal spectral overlap (for example, Alexa Fluor 680 and 800).
- Use an appropriate imaging system capable of distinguishing the emission spectra of the different dyes.
- Always optimize the exposure times to ensure that all signals are within the linear range of detection.
Imaging and Data Analysis
Once you’ve completed the staining and washing steps, it’s time for imaging and data analysis. Here are some tips for optimal results:
- High-Resolution Imaging: Use a fluorescence scanner or imaging system capable of detecting the specific fluorophores you’ve used. Ensure that the system offers good resolution to detect low-abundance proteins.
- Exposure Time: Too short an exposure will result in weak signals, while too long an exposure can saturate the signal. Adjust the exposure time to get an optimal image where all bands are clearly visible without overexposure.
- Quantification: Fluorescent signals can be quantified using image analysis software. Ensure that your data are analyzed within the linear dynamic range of the fluorophores used.
7. Storing and Re-imaging Blots
Fluorescent Western blots can often be stored and re-imaged after the initial analysis. However, keep in mind that prolonged storage can cause fading, especially if the blot is exposed to light. Store your blot in a dark, dry place to preserve the fluorescence, and if necessary, re-image at later time points to monitor signal changes.
Conclusion
Fluorescent staining in Western blotting enhances your ability to detect, quantify, and analyze proteins with greater sensitivity and flexibility. By selecting the right fluorophores, optimizing antibody concentrations, reducing background, and employing multiplexing, you can take your Western blotting experiments to the next level. With these tips, you’ll be able to extract more detailed and reliable information from your protein analysis, helping to answer more complex biological questions.