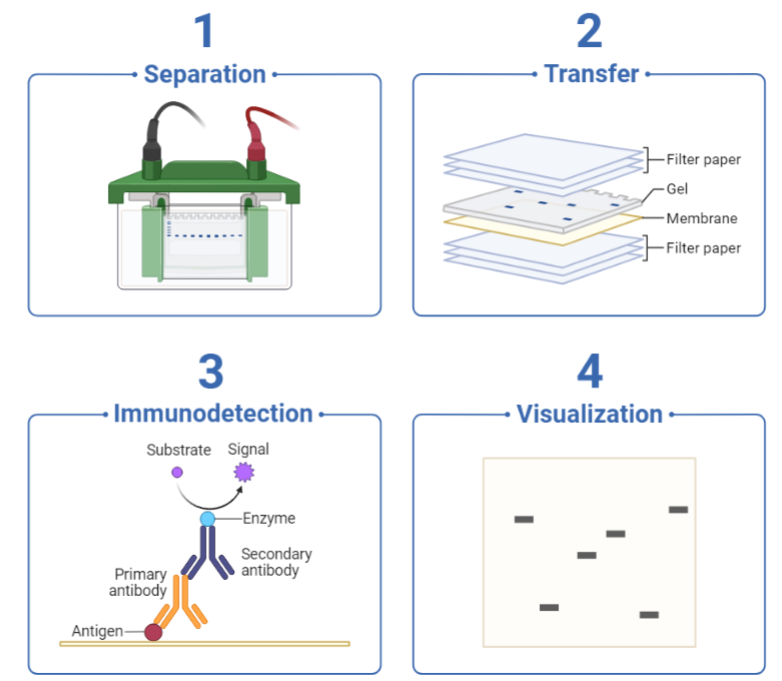
Western blotting is a cornerstone technique in protein research, allowing researchers to detect and analyze specific proteins in complex samples. Whether you’re a seasoned scientist or a student just starting out, the process can be challenging, with numerous steps that can influence the quality and accuracy of your results. In this blog, we’ll share some essential tips and tricks to help you achieve Western blotting success, troubleshoot common issues, and optimize your workflow.
1. Start with High-Quality Samples
Tip: Ensure that your protein samples are of high quality and properly prepared.
A successful Western blot starts with good quality samples. Ensure your protein extract is clean and free from contaminants that could interfere with antibody binding or protein transfer. Some key tips include:
- Use fresh or properly stored samples: Proteins are delicate and degrade quickly, so use freshly prepared samples or store them appropriately (usually at -80°C).
- Avoid protease degradation: Always include protease inhibitors in your lysis buffer to prevent protein degradation.
- Quantify your protein: Before loading the gel, make sure you know how much protein you’re adding. Using too little protein can result in weak or undetectable bands, while too much can lead to smearing or poor resolution.
2. Optimize Gel Preparation and Running Conditions
Tip: Carefully optimize the gel composition and running conditions to achieve the best separation of your proteins.
- Use the right gel concentration: Choose the correct acrylamide concentration based on the size of your target protein. For smaller proteins (less than 30 kDa), use a higher acrylamide percentage (12-15%). For larger proteins (over 100 kDa), use a lower percentage (8-10%).
- Ensure proper sample loading: Load equal amounts of protein in each lane to make comparison easier. Avoid overloading, as it can cause poor resolution.
- Running conditions: Always run the gel at the appropriate voltage to ensure proper protein separation. Running too fast can cause the proteins to move too quickly, resulting in poor resolution, while running too slow can lead to band smearing.
3. Transfer Optimization
Tip: Optimize the transfer conditions to ensure efficient and uniform protein transfer from the gel to the membrane.
The protein transfer step is one of the most critical in Western blotting. If proteins aren’t transferred properly to the membrane, the blot will fail. To ensure success:
- Choose the right membrane: PVDF (Polyvinylidene fluoride) membranes are ideal for long-term storage and higher binding capacity, while nitrocellulose is more commonly used for high-quality protein detection.
- Optimize transfer time and voltage: For standard protein sizes, transfer at 100 V for 1-2 hours at 4°C. For larger proteins, you may need to adjust the transfer time. Too short of a transfer can result in incomplete transfer, while too long can cause nonspecific binding.
- Use a transfer buffer with the right composition: Ensure your transfer buffer contains methanol, which helps the proteins bind to the membrane and aids in removing SDS (which can hinder protein binding to the membrane).
4. Blocking for Low Background Noise
Tip: Block your membrane effectively to minimize background noise and nonspecific binding.
Blocking is essential for reducing background signals and ensuring that the antibodies bind only to the protein of interest:
- Use the right blocking agent: Common blocking agents include 5% non-fat dry milk (for most applications) or BSA (for some specific antibodies). Milk can cause high background for some proteins, so try using BSA if necessary.
- Blocking time and temperature: Block your membrane for at least 1 hour at room temperature or overnight at 4°C for optimal results.
- Avoid over-blocking: Over-blocking can reduce the efficiency of antibody binding to the target protein, leading to weak signals.
5. Optimize Antibody Concentration and Incubation Times
Tip: Use the right antibody concentrations and incubation conditions to get clean, specific bands.
The key to a successful Western blot is using the right primary and secondary antibodies at optimal concentrations:
- Primary antibody optimization: Start with the recommended concentration from the manufacturer but optimize it for your specific sample. Too much primary antibody can result in high background, while too little can lead to a weak or no signal.
- Incubation time and temperature: Incubate your primary antibody overnight at 4°C for better binding and specificity. For secondary antibodies, a shorter incubation time (1 hour at room temperature) is typically sufficient.
- Use high-quality antibodies: Always ensure that your primary and secondary antibodies are validated for your target and application. Non-specific antibodies can lead to high background and unreliable results.
6. Wash Thoroughly and Carefully
Tip: Perform thorough washing to minimize nonspecific binding and reduce background.
Washing your membrane after antibody incubation is critical to remove unbound or nonspecific antibodies:
- Wash buffer composition: Use a wash buffer containing TBS or PBS with 0.1% Tween-20 (TBST or PBST) to help remove nonspecific interactions.
- Wash multiple times: Perform at least 3 washes of 5-10 minutes each after primary antibody incubation, and again after secondary antibody incubation. More washes can help reduce background noise.
- Gentle washing: Make sure the washing process is gentle but thorough to avoid stripping antibodies from the membrane.
7. Detection and Signal Development
Tip: Choose the right detection method and optimize the exposure time for clear and specific results.
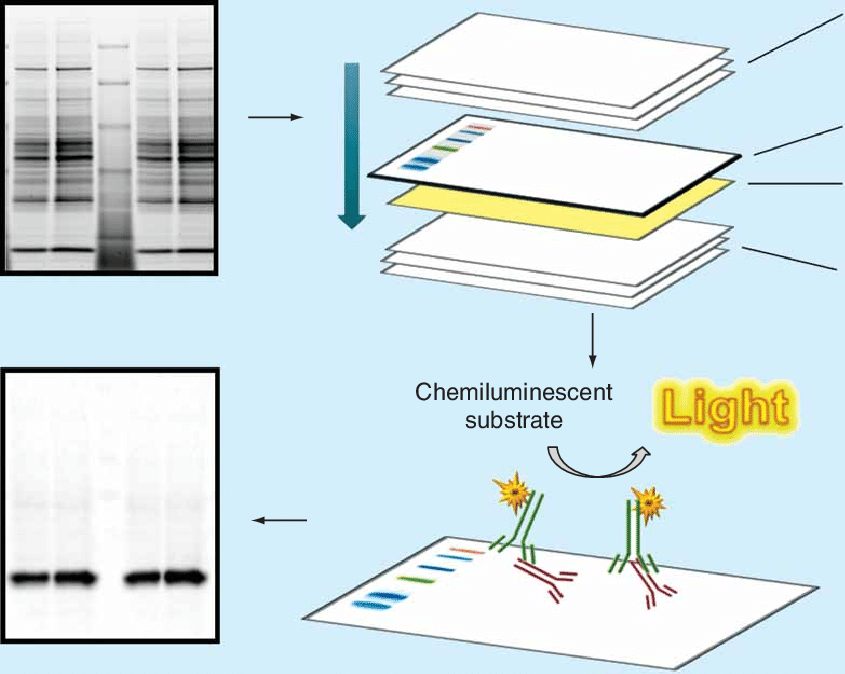
There are several ways to detect your protein bands, including chemiluminescence, colorimetric detection, and fluorescence:
- Choose the right detection method: Chemiluminescence (using HRP-conjugated secondary antibodies) is the most popular method, providing high sensitivity and low background. Fluorescent detection is also becoming more popular due to its multiplexing capabilities.
- Optimize exposure time: For chemiluminescent detection, exposure time to the imaging system should be optimized to prevent overexposure or underexposure. Start with short exposure times and increase if the bands are faint.
- Use proper imaging equipment: Use a high-quality imaging system (like a CCD camera or an X-ray film system) to ensure accurate detection of the signal.
8. Troubleshooting Common Issues
Tip: Know how to troubleshoot common problems and avoid common mistakes.
Here are a few common issues and troubleshooting tips:
- No bands or weak bands: Check your antibody concentrations, protein loading, and transfer efficiency. Make sure that your proteins are transferred well, and that the antibodies were specific and properly incubated.
- High background: Try using a different blocking agent (e.g., BSA instead of milk) or reducing antibody concentrations. More thorough washing can also help.
- Smearing: Smearing can be caused by overloading protein, incomplete transfer, or degradation. Reduce the protein amount loaded on the gel, optimize transfer conditions, and check sample integrity.
- Conclusion: Western Blotting Success Awaits
- Western blotting may seem daunting at first, but with the right technique and attention to detail, it’s possible to achieve reliable and reproducible results every time. By carefully optimizing sample preparation, gel conditions, transfer, antibody incubation, and detection, you can maximize the sensitivity and specificity of your Western blot. And don’t forget troubleshooting is an essential skill in mastering this technique.
- Whether you’re validating your research or confirming protein expression, following these tips and tricks will help you overcome common challenges and ensure Western blotting success in your lab.

